Vent.X tips – Throw pattern designer

In this article, we explain in more detail what is included in the Throw pattern designer tab. You can access the design of the throw pattern designer from the tabs in the Products front page. From the menus that open on the left side of the view, you can change the information of the device, room and throw patterns. Everything you need is easily in one view.

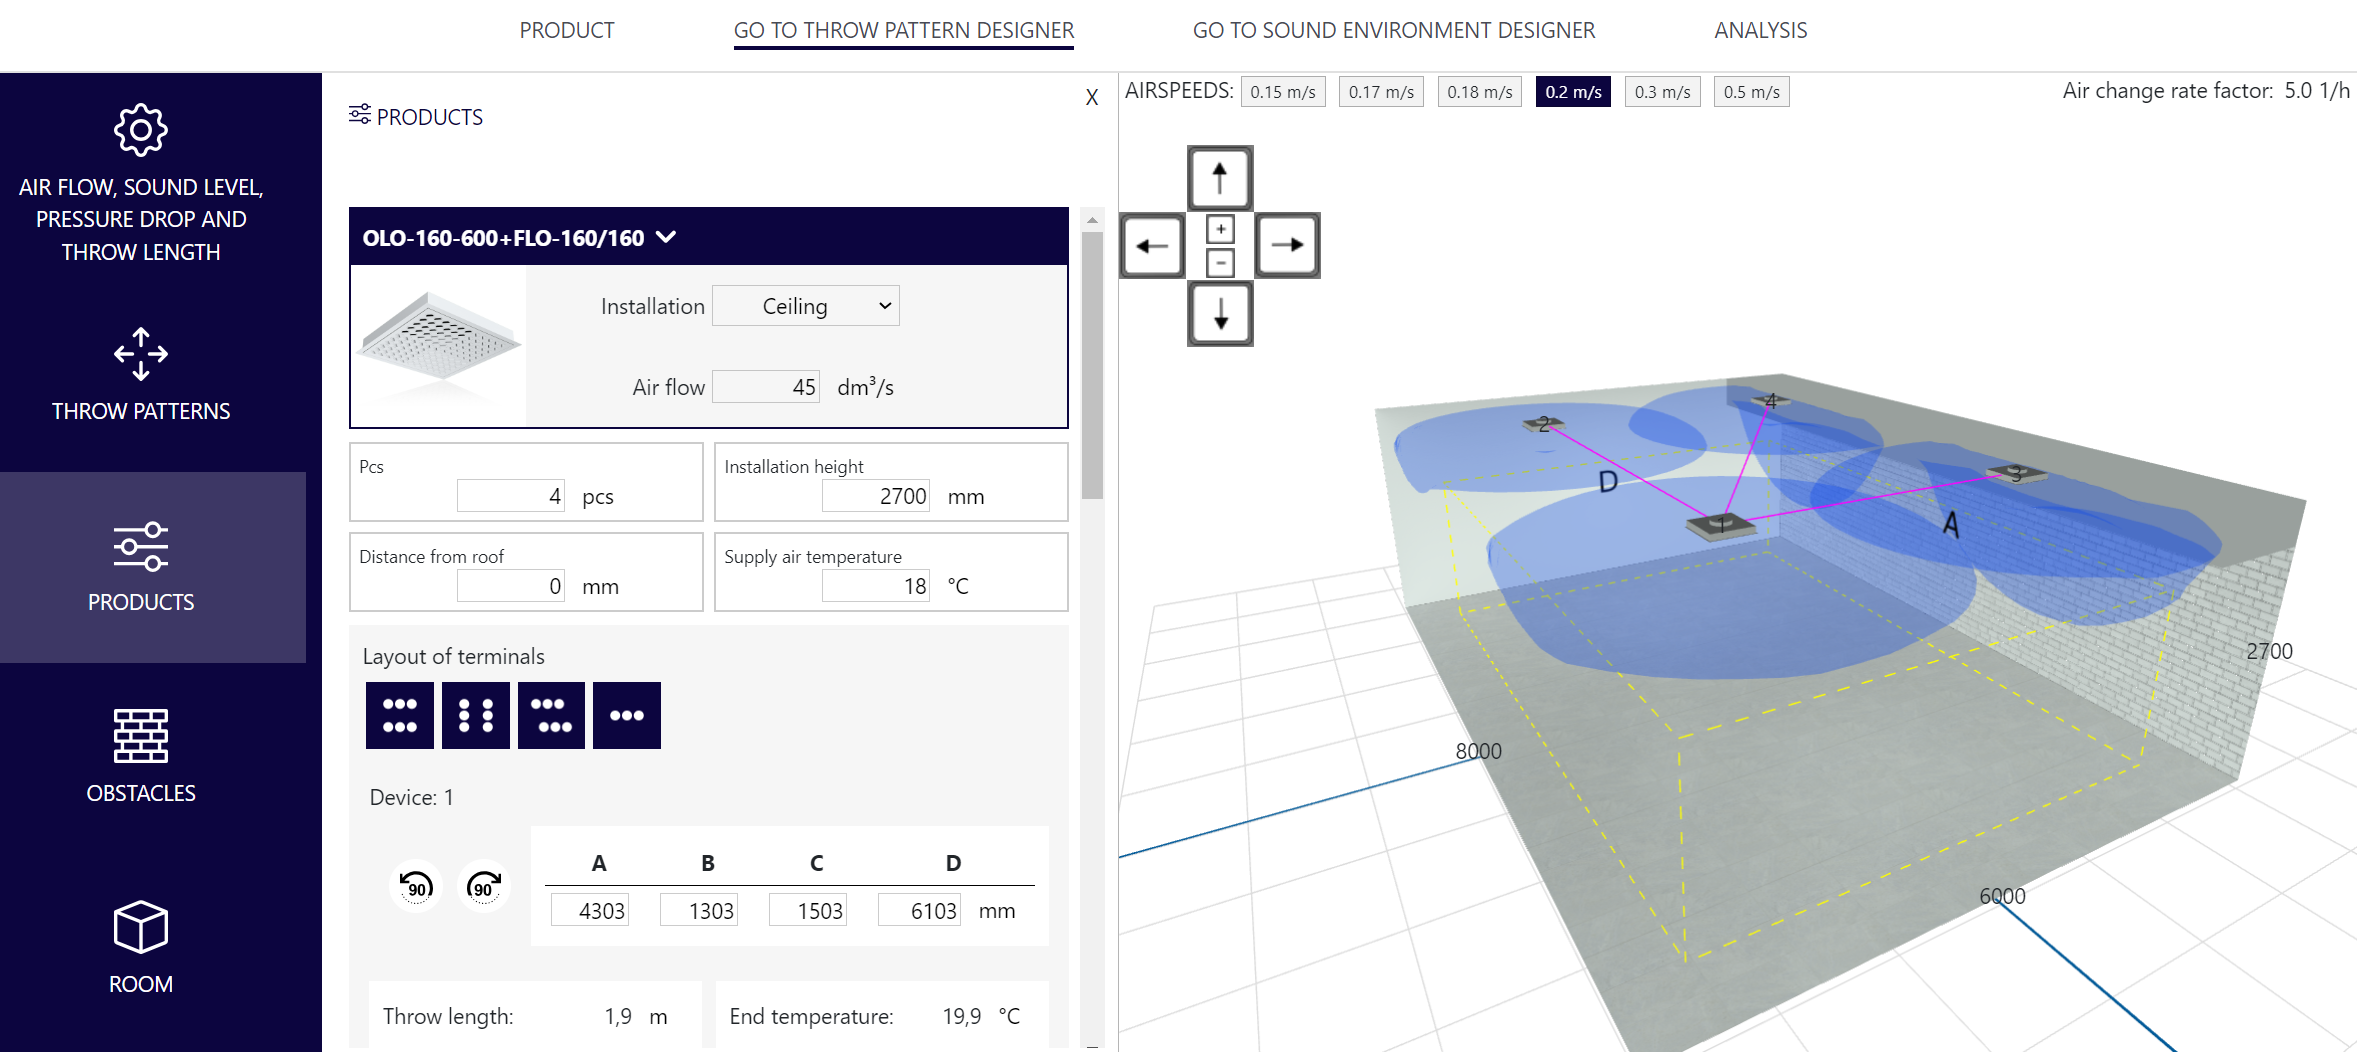
Airflow, sound level, pressure drop and throw length: The device information can be edited and the airflow can be adjusted to a certain level or according to the structure of the space in this menu. If there is more than one air terminal device in the plan, the information of each device can be edited from the drop-down menu below.

Throw patterns: You can choose the most suitable throw pattern for the device or direct the throw pattern as required.

Devices: The location, size, number, installation height, or supply air temperature of the device(s) can be changed in this menu. If there are several devices in the plan, you can use their location buttons at the bottom of the menu. If the device can be installed both on the ceiling and on the wall, you can choose the installation location.

Obstacles: You can add obstacles to the space, and define their dimensions and locations. Obstacles can be used to model, for example, beam structures in the ceiling.

Room: Enter the dimensions of the room from the menu, if necessary, you can add a lower ceiling grid, which also works as a snap net for transferring terminal devices.

Air speeds: From the upper left corner of the simulation screen, you can activate at which air speeds the throw patterns are displayed.

Air change rate factor: In the upper right corner of the simulation screen, you can see the air change rate factor of the space.


Go to Vent.X

More Vent.X tips

adding obstacles

News

Top-quality indoor climate through smart choices – insights from Engineering Company Lappialämpö

According to Tero Lehtola, CEO of Lappialämpö, the indoor climate quality can be influenced surprisingly much even by the choice of diffusers. In Lappialämpö’s projects, the combination of HRV units, duct coils, and our RINO and LINE diffusers forms an effective system that ensures an even, draft-free indoor climate—just as it should be in comfortable, functional spaces. Lappialämpö Oy is a reliable full-service building services engineering company in the Lapland region, with a particular strength in high-quality, comprehensive HVAC design.

Read more

Get to know: Sales Manager Veli-Matti Piispanen

A favorite among customers, Veli-Matti knows snow and rain covers, roof hoods, and hoods like the back of his hand. Veli-Matti, or Velsu as he’s known to friends, has been working at Climecon since 1999. In addition to his sales role, he also helps manage products for snow and rain covers, and roof hoods together with the Product Manager. His enthusiasm for his work is as strong as it was at the start of his career, and as a thrill-seeker, Velsu is always ready for new adventures.

Read more

Manage life cycle costs effectively – energy-saving smart ventilation

The costs of a construction project do not end when the building site is completed. The real expenses accumulate over the entire lifecycle of the building: from energy use, maintenance, and the lifespan of the systems. When new systems are put out to tender, the purchase price alone does not reveal the total cost of the investment. The Life Cycle Costs show which solution is truly sensible both economically and environmentally. When solutions are designed to be long-lasting and energy-efficient, the building consumes less energy, emissions decrease, and indoor air quality remains high year after year.

Read more